Mounting Drives
Updated on 28 Dec 2018
Understanding NAS and protocols
We can use our NAS directly from Ubuntu. For this we will use CIFS – a version of SMB. Some of the common shares in use include:
- Apple (AFP) Shares: the Apple File Protocol (AFP) type of share is a good choice if all of your computers run Mac OS X.
- Unix (NFS) Shares: the Network File System (NFS) type of share is accessible by Mac OS X, Linux, BSD, and the professional and enterprise versions (not the home editions) of Windows. It is a good choice if there are many different operating systems in your network. Depending upon the operating system, it may require the installation or configuration of client software on the desktop.
- WebDAV Shares: this type of share is accessible using an authenticated web browser (read-only) or WebDAV client running on any operating system.
- Windows (CIFS) Shares: the Common Internet File System (CIFS) type of share is accessible by Windows, Mac OS X, Linux, and BSD computers, but it is slower than an NFS share due to the single-threaded design of Samba. It provides more configuration options than NFS and is a good choice on a network containing any Windows systems.
- Block (iSCSI) shares: this type of share appears as an unformatted disk to clients running iSCSI initiator software or a virtualization solution such as VMware
Additional information can be found on the freenas sharing website.
I am using CIFS because it has a lot of configuration options like username / password which NFS doesn’t support (or I can’t figure out how to configure it). NOTE, recently Samba (which includes CIFS) recently changed so that symlinks will no longer be supported
Install the necessary software
Step 1
sudo apt-get install cifs-utils
Step 2, create your directories
You will need a separate directory for each mount. Mounts are usually done in the /mnt directory.
cd /mnt
sudo mkdir /backup
Step 3, edit the fstab file
Edit your /etc/fstab file (with root privileges) to add this line:
Ubuntu 16
//breia-nas/uBackup/test1 /mnt/backup cifs guest,uid=1000,iocharset=utf8 0 0
Ubuntu 18
//breia-nas/uBackup/test1 /mnt/backup cifs guest,uid=1000,gid=1000,iocharset=utf8 0 0
Where
guestindicates you don’t need a password to access the share,uid=1000makes the Linux user specified by the id the owner of the mounted share, allowing them to rename files,iocharset=utf8allows access to files with names in non-English languages.
Step 4, mount the device
sudo mount -a
Screen shot below shows the mounted drive and the folder that we created for. The screen shot is for the password protected NAS, the setup of which I’ll show next.
Step 5, password protected
You can set up password protected areas on your NAS thru the NAS UI.
The quickest way to auto-mounting a password-protected share is to edit /etc/fstab (with root privileges), and add the username and password parameters:
Ubuntu 16
//breia-nas/uBackup/test1 /mnt/backup cifs username=brent,password=****,iocharset=utf8,sec=ntlm 0 0
Ubuntu 18, the security is ntlmssp.
//breia-nas/uBackup/test1 /mnt/backup cifs username=brent,password=****,iocharset=utf8,sec=ntlmssp 0 0
If you prefer, we can add the credentials to a separate file and change the permissions instead. Note: The username and password you use is what you set during the NAS setup.
gedit ~/.smbcredentials
Enter your username and password in the file:
username=msusername
password=mspassword
Change the permissions of the file to prevent unwanted access to your credentials:
chmod 600 ~/.smbcredentials
Then edit your /etc/fstab file (with root privileges) to add this line (replacing the insecure line in the example above, if you added it):
Ubuntu 16
//breia-nas/uBackup/test1 /mnt/backup cifs credentials=/home/brent/.smbcredentials,iocharset=utf8,sec=ntlm 0
Ubuntu 18
//breia-nas/uBackup/test1 /mnt/backup cifs credentials=/home/brent/.smbcredentials,uid=1000,gid=1000,iocharset=utf8,sec=ntlmssp 0 0
Now you can reload your mounts.
sudo mount -a
Mount a drive from SSH
You may want to copy files from one system to another. First we need to install the ssh file share application
sudo apt-get install sshfs
Next we can create a new directory (I’ve done this in mnt location).
mkdir -p mnt/sshfs
sshfs 192.168.1.2:/ /mnt/sshfs
When we are finished, we can simply unmount.
sudo umount mnt/sshfs
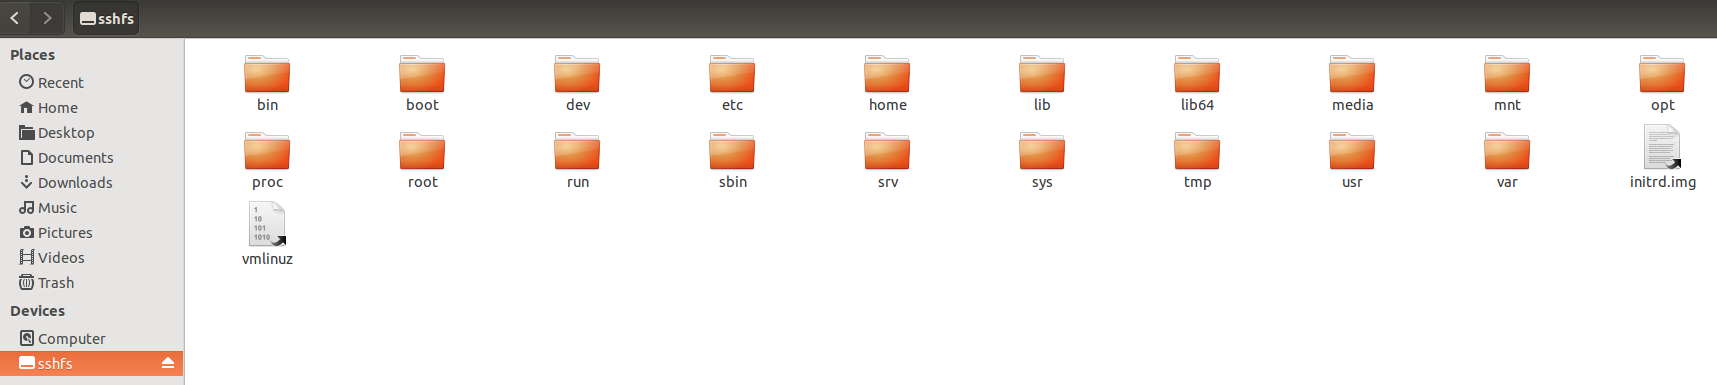
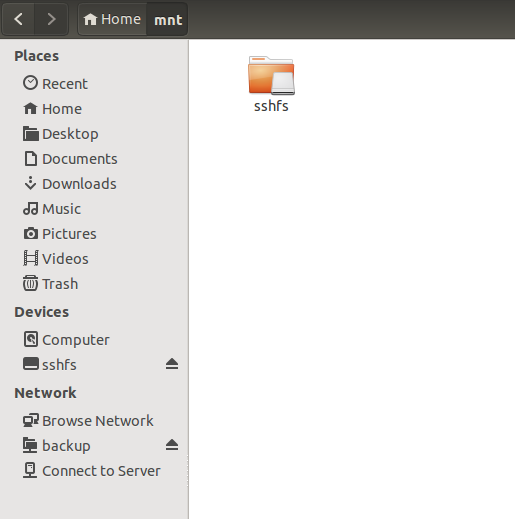
On our system, we’ll see the new folder / share showing up. This would be mnt/sshfs (the same as what we created in the earlier steps). Also we will see the folder name appear in the devices tab. Once we go inside the sshfs folder, we’ll see everything from root (we specified ip:/).
Inside the sshfs folder we created. This has mounted our external system as a folder in our local system.